Thursday, May 19, 2011

How To Mend a Dog-Ripped Comforter

Last night, I had every intention of manicuring my nails. One home from work, I immediately traveled upstairs to change out of my work clothes into something more comfortable. However, what do I notice on the floor by the bed? The comforter. And what do I see hanging out of it and thrown all over the floor? The stuffing. Damnit! Dodger likes to chew and when you've been gone too long for his liking or during a time when you should be home, he finds something to take it out on. Yesterday, it was the comforter. Here's the damage:

 ripped comforter

the culprit

After dinner, instead of manicuring my nails, I grabbed my sewing kit and got to mending. I learned three things from this. First, this would have been a whole lot easier if I had a sewing machine. Let me rephrase. It would be a whole lot easier if I had a WORKING sewing machine. We have two. One is a janky hand-held machine that jams after two stitches. The other machine would be great, but we don't have the power cord for it. We have everything else, but no dang power source. Therefore, I was forced to sew by hand. Second thing I learned was that when mending by hand, I should work in shorter pieces. Not knowing any better, I cut off too long a piece of thread. That was dumb! It kept knotting and tangling and twisting and knotting again. It was a vicious cycle! Next time I will work in shorter pieces to prevent the knotting, tangling, and twisting. The final thing I learned was that this takes forever (or that I'm extremely slow). I'm probably really slow because it took me two episodes, sans commercials, of Criminal Minds (thank you Netflix). 

see the string hanging toward the left?
sorry about my face!

the mended result
Good thing this was on the back of the comforter because it doesn't look pretty! But, hey, as long as it keeps the stuffing in there, I don't care. I'm just thankful it was repairable because I didn't want to buy another one only to have it ruined. 

Happy Mending!
--Am

Saturday, May 14, 2011

How To Make "Perfect Pound Cake"

Today has been a day of new things for me. It was my first time at a real garden shop where I actually bought stuff. It was also the first time I baked something that turned out pretty good, if I do say so myself. Before I left for the garden shop, I sat outside with Al while he smoked a cigar and drank sweet tea (which he had to re-sweetened by adding equal). The dogs were roaming, while I leafed through the May 2011 edition of Everyday Food. I usually find that I like 90% of the recipes in there, while Alex will only like 40% of what I like. It's not that he's picky, but he's not very food adventurous or necessarily healthy.  In this edition, I found a recipe for perfect pound cake. Here's what you do:
  • One cup unsalted butter, room temp
  • 1 cup sugar
  • 1 tsp vanilla extract
  • 5 large eggs, room temp
  • 1/2 tsp salt
  • 1 1/2 cups all-purpose flour
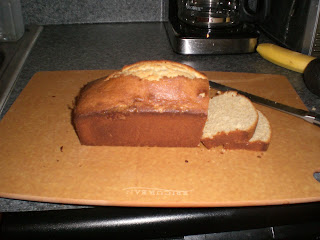
Preheat oven to 350 and lightly butter and flour a 4 1/2 by 8 1/2 inch pan. Beat butter and sugar in an electric mixer on medium high until light and fluffy, approx. 7 minutes.  Scrape down the sides and beat an additional minute. Add vanilla and gradually beat in eggs. Set mixer to low, add salt, and gradually add flour. I subbed 1/2 cup of whole wheat flour. Once combined, transfer to loaf pan and bake for 65 minutes. Poke the center with a toothpick and remove from oven if it contains a few moist crumbs. Let it cool on a wire rack for an hour. Once cooled, the loaf can be removed from pan and sliced as preferred. Any unused portion can be wrapped in plastic and stored for 3 days. Here are some pics of the process: 

sugar and butter being beaten

loaf cooling

sliced…yum!

I must admit that whenever I bake just about anything, it is complete crap. However, this turned out to be pretty tasty! It's an easy recipe that anyone will be able to follow. It will be a fabulous breakfast treat over the next couple of days. Or, maybe I'll melt some chocolate and spread it on a slice for a scrumptious dessert. Who knows? All I can say is that it will definitely be eaten up! 

Happy baking!
--Am

How To Eat Spaghetti and Morph into a Baby

My nephew turned three weeks last Wednesday (5/11). Al and I offered to take them dinner to help make things a little easier (although they are doing fabulously)! I knew I wanted to make a spaghetti dish with grape tomatoes that I had used before in Everyday Food. So, I headed to the website and this was what I found. I followed the recipe to a T with the exception of using half whole wheat spaghetti and layering sliced, fresh mozzarella on top. It ended up being a light, summery spaghetti that made me smell like garlic for the next two days (I think the smell has finally left the body). At least it tasted good!

While we were sitting down to dinner, I looked over at the new little guy and noticed that he had started to look like a human. I know that sounds bad, but please don't take it that way. I said (out loud), "He's starting to look more like a human." My sister agreed. Relief on my end for just saying that my nephew looked a little alien-esque. And it's not just him, it's all newborns. They are wet, shiny, and haven't developed many features. Chance is really starting to grow into his features and the handsome little man he will be. I'm so glad and fortunate to be able to see him so often and experience his morphism from alien-baby to human-baby! I can't wait until we reach dinosaur-twos, mutant-teenager, and eventually, man-man. 

To all you aunts and uncles out there, live it up and visit often. These little guys and girls are often-changing and it's easy to miss something so big! I sure do love mine and wouldn't want to miss a thing! 

Happy Aunting and Uncling!
--Am

PS - Sorry there are no pictures…I'm terrible about taking my camera with me!  

Sunday, May 8, 2011

How To Make a Pop-Up Mother's Day Card

While reading my May 2011 edition of Martha Stewart Living (thank you Aunt Becky), I saw a tutorial on making a pop-up bouquet that could be used as a mother's day card. Good thing I was actually reading this on time inside of month behind because then I never would have seen it, and my many moms would have received a store bought card. I find it more rewarding making something for someone rather than buying it. The receiver usually likes it more too!

I set out to make six of these cards. Fortunately, I had all the materials I needed at home, so all it took was my hard work and a Sunday and Monday evening. Each card required seven 4 inch squares of varying colored cardstock and a rectangular ivory or white cardstock cut to a size 10-by-6-inch. I think my rectangle was 11-by-4.5 inch. As long as the flower will fit in it, the size doesn't matter. As for colors, I chose pink, turquoise, gold, lavender, mauve, dark purple, and peach. I originally was going to cut leaves with the green, but later decided against it (because I didn't quite know where to place them).


Each square was folded twice to form a small square. Next it had to be folded into a triangle by folding one corner down, then my flipping it over and folding the other side down. Then half a heart was drawn on one side as a guideline for cutting. I had to be careful where I was drawing this as in some cases, I cut it and it became two pieces instead of one. This could also have been because I folded the triangle incorrectly. It might be good to do a couple of tests. Once I figured it out, it became pretty easy. I cut along the pattern and an eight petal flower was formed (see the gold, left). One petal was cut out and the gap was closed by overlapping one petal with another and gluing it tight. This formed the six petaled flower (purple).


This took a long time to get them ready. And by long time, I mean the length of A Walk To Remember on ABC Family, so commercials were involved. I finished the flowers and quit for the night. On Monday, I popped in Freaky Friday and got to work building the bouquet. There were seven flowers for each bouquet. I laid it out with six flowers forming a circle and one in the middle. Each flower was attached to three other flowers using double sided tape.

It took me forever to figure out how to put the completed bouquets inside the card. The first couple of times I tried, it wasn't folding correctly or sticking the way I had imagined, so I just stuck the flowers on the outside. Then I thought, "how the heck am I going to mail the ones that need to be mailed?" So, I worked a little bit harder and figured out how to get them to fit inside and be true pop-up cards. Here are the final products!

pop-up on the outside


pop-up on the inside

Visit here for the complete instructions on how to make this card. For all you mom's or soon-to-be-moms, Happy Mother's Day! I know I'm so very thankful for all the moms in my life!

Happy Mom's Day, 
--Am

Sunday, May 1, 2011

How To Take Forever to Make a Very Wide and Very Short Scarf

Back in December I got very ambitious and decided to learn how to knit. I found some very informative guides on youtube to help me get started (and to finish). It took me forever to figure out how to do a slipknot, but I finally found an easy to follow video. I had to reteach myself this, as I already forgot, and I still found it difficult.  I can be so challenged at times!

I casted on 60 times (whoa!) and went through three rolls (which I later learned are called skeins) of yarn. All I learned originally was the knit stitch. So, I knit stitched 98 rows. Sorry if that terminology is wrong, I'm not an expert. During that time, my mother in law was over and taught me how to purl. She is so fast with the needle. She knits using a different technique than I do, but I can't remember what it's called (can you help me out Katherine?). It's so much easier to learn from someone in the flesh than it does from a video, so I'm thankful for her showing me the ropes!

For my second skein, I decided to change the pattern to knit, purl, knit, purl, knit, purl. The next six rows would then be purl, knit, purl, knit, purl, knit. This created rows that were flat on one side and raised on the other. There are 17 rows like this in total. For the final skein, I went back to using the knit stitch for the final 98 rows. At the end, I used this video to learn how to cast off.

All in all, it was pretty easy to do. Although there are some imperfections and it's an awkward width and length, I'm pretty proud of what I made! Take a look for yourself:

about two thirds of the scarf

wrapped around once

Happy knitting!
--Am