Saturday, March 3, 2012

How To Make a Tree Bookshelf

Wow! It's been quite a while since my last post. I'm going to stray from my usually format and try to give you an actual how to, since I think it's something people might actually want to make.

When deciding on a theme for the nursery, Al and I went back and forth between and under the sea theme and a woodland theme. Not knowing if we are having a boy or a girl, we needed something neutral. Eventually, we decided on the woodland theme. Somewhere along the way, we thought a bookshelf that looked like a tree would be pretty cool. We found two different types online: Graphic Spaces Woodland Happy Tree for $2100 or Shawn Soh's tree bookshelf for $850. Yeah, we can't afford either of those!! Since Al is pretty handy and artistic, he decided he could whip something up for around $250. I love a handy husband! :)

Here's what you need:

12 2" x 6" x 6' planks
Wood glue
Sander
Saw
Paint of your choice
L brackets and hardware

We decided the bookshelf would be more space efficient and look more 3 dimensional if it was in the corner as opposed to just stuck on the wall. The bottom branches would be three feet long, the middle branches two feet, and the top one feet. Keeping that in mind, we took two of the planks and cut them so we had two 3ft pieces, two 2ft pieces, and two 1ft pieces. We drew branches on each of these for our template. For the trunk, we used two 6ft planks and drew our template on those. Al then cut out the templates. Each branch was 4 pieces thick, so Al was going to be spending many days cutting and gluing pieces together. Fortunately, my dad knows a guy with a state of the art woodshop (Thanks Dad and Steve!). He let us drop off our remaining pieces for him to glue and cut out. Not only did this save us a lot of time, but it looked more like one piece as opposed to multiple pieces glued together.

Once all the pieces were cut and returned home, we glued on our original templates and began the painting. As usual, we couldn't decide what the right paint color would be, so we ended up taking the bedding into Home Depot and matched it with a green and red. I don't know what made us do it, but we went with the red. And I must say, that it looks stunning! So glad we went with that over the green. After it was painted and dried, we got assembling. We found some pieces could be assembled to the trunk, while other pieces were better attached to the wall using L brackets. After it was set up, we painted the hardware and started decorating. Thanks to my sis for having guests at the baby shower bring a book in place of a card, we are able to stock the tree full of books. And thanks to my mom and aunt for providing stuffed animals for additional character. We couldn't be more pleased with how it turned out!!


the finished and stocked tree bookshelf


Don't you just love it? :)
Happy Bookshelfing!
--Am


Monday, December 26, 2011

How To Install a Ceiling Fan

I know, I know, all those design shows talk about how ceiling fans are such a eyesore and that they should never be in your house. Well, we like to have decent air flow and coolness when it's hot, so we have fans. In fact, every room that would need a fan, now has one. We spent our Christmas night cleaning out the loft and tidying the soon-to-be nursery. That's when Al decided that he needed to install the fan in the nursery. Yeah, it was ten and I was getting tired.

This brought me back to the time we installed the fan in the guest bedroom. The fan was up, and well, not working. We flipped the switch and either the lights worked or the fan worked, but not both together. For some reason, Al decided to have me check the wires to make sure they were correct. However, the switch was not flipped down and as soon as wires were touching, my body was jolted with electricity. It took me a minute to realize what happened, then...waterworks. It wasn't a totally big deal, but it scared me enough that I just stood there, couldn't move, and wept. Al was stuck there holding the fan parts up while I broke down. He didn't know if he should comfort me, laugh at me, or yell at me. I think a little bit of all of that happened, but I don't quite recall all the details. I just remember feeling the electricity go thru my body and standing there not being able to do anything. As you know, I survived with minimal damage.

Last night, in the three times that Alex had to recheck the wires and partway dismantle the fan, I was sure to flip the switch in the down position. I wanted to make sure that we didn't have a repeat electricity offense. Although we did almost have a broken leg or concussion on Al's end, all ended up well and I was in bed a little after 11.

With the room painted, fan installed, and room partway cleared, the nursery is starting to come together! Next project on the list is to re-arrange the loft and to get Al started on the bookshelf. WOOHOO!! Having a baby really gets you in the mood to have your house in order. :)

Happy Installing!
--Am

Sunday, December 11, 2011

How To Rock Out in the ER on Thanksgiving

Yeah, that was how we spent two hours of our Thanksgiving evening. Before I go into any sort of detail, I should say that everyone is fine and no body parts were harmed!

Our trip began by driving 12 hours in the non-stop rain from Indy to Cortland, NY on the Tuesday before Thanksgiving. We and off listened to Harry Potter and took bathroom and food breaks. We got in around 11pm and headed to bed shortly thereafter. Wednesday was when all the trouble began. Shortly after playing a round of putt-putt and lunch, I started to feel like my allergies were getting the best of me. I got some pregnancy-safe meds hoping they would take my sniffles and headache away. Wednesday night was a little rough as I was having a hard time breathing and falling to sleep. Even with a dose of Tylenol PM I couldn't seem to get comfortable breathing-wise.

On Thanksgiving day, we headed to the park, and I was really hoping the fresh air would help clear me up. It was nice, but it didn't help me at all! We at lunch/dinner around 3 and that just seemed to make matters worse. I had a full belly and climbing the stairs seemed like the biggest chore! It finally got bad enough that Al called the OB back home and decided it was best to hit the ER. Boy, was I excited...NOT!

We get there, wait a bit, take my vitals, and stick me in a room. The nurse or someone listened to my lungs and heard wheezing. The doctor came in and said, it could be one thing or it could be another. We're going to run some blood tests, give you a breathing treatment, hook you up to an EKG, x-ray your chest, ultrasound your legs, and give you a CT scan. At this point, I start to freak out. I'm thinking, I'm pregnant and I don't want to put the baby through all these tests and I don't want to go through all these tests. So, after lots of talking about options, we decide to wait to see what the blood work says as that will determine which route to take. The doctor was sure it would come back positive for the possibility of a blood clot because I was prego. If it was negative, then it was most likely a breathing issue and not a blood clot issue.

During this time, there were six people that came in to do different things to me. A very nice man gave me the breathing treatment; a very rude lady that wasn't sure how to ask if I was pregnant or fat hooked me up to the EKG; a lady named Gloria and dressed in street clothes checked the baby's heart rate; a nurse drew my blood; a youngin' took all my insurance information; and a lady came in to talk to me all about the x-ray that I wasn't going to happen. All these people were in addition to the 2 triage nurses I had when I first arrived, the resident that saw me shortly after, and the doc. Really? Is it necessary to have all those different people? Freaking crazy town! No wonder ERs are a mess. Too many hands in the honey pot.

Overall, the blood tests came back negative for a blood clot, so the doc was fine sending me home with an inhaler. With the baby, a full stomach and a very bad cold, it was the perfect storm for pressure on my lungs causing breathing problems. I still have a bit of the cold left, but it's nothing like it was. And I have only had to use the inhaler about five times and none since I've been back in Indy. So, all things considered, I'm good and baby's good! Now, if only this cold would leave me alone!

Happy Easy Breathing!
--Am   

PS: How was your Thanksgiving? Hopefully less eventful!

Sunday, November 20, 2011

How To Make Yogurt Pops

While passing the time by obsessing over Twitter, I found a website called Chobani Kitchen. It has all sorts of recipes and videos using Chobani yogurt as an ingredient. I really wanted some dessert-y ideas since I seem to be constantly craving something sweet. And although people say I'm eating for two I still want to be sure to not overdo it as that is so easy to do! So, instead of having a pint of ice cream, I've opted for the these pops.

I used two separate recipes: vanilla or chocolate pops and berry pops. For the vanilla pops, I used 1% milk and vanilla greek yogurt. I must say that these were kind of bland. I think I'll add some honey to them the next time. Since I really don't like chocolate syrup, I opted to whisk in creamy peanut butter and chocolate chips. This mixture really satisfies the sweet tooth! Finally, the berry pops suggested using plain greek yogurt, but I didn't have any so I used the vanilla. Alex was also kind enough to pick up some unsweetened, frozen raspberries, blueberries, and strawberries for my puree. I guestimated how much to puree and mixed in the berries with the yogurt and some honey. Now, I haven't tried this mixture yet, but I did take the remaining puree and mix it with some vanilla greek yogurt and honey. And wow! This was super tasty and will replace the pre-mixed yogurts I've been buying.

These pops take about 6 hours to freeze and are a tasty, healthy, late-night treat!

 peanut butter choc chip, vanilla, mixed berry


Happy Pops!
--Am

Wednesday, November 2, 2011

How To Hate Maternity Pants

I tried the rubberband trick. I tried just wearing the pants too tight for my own good. I tried wearing my fat pants. But I've now gotten to the point where I must wear maternity pants in order to be any kind of comfortable. And boy do I hate them!

They have this band that comes up to my boobs and the actual pant part is so low-cut that I am forced to wear long shirts. The longer shirts in turn, cut off my legs and make me look short and frumpy. The part that covers my stomach irritates the crap out of my skin, so all I do is itch it all day long. Seriously, I just stand and itch my growing belly. I can't win with these pants! Am I the only one with these problems? Answer: Most likely cause I'm weird!

Fortunately, I have found one pair of work maternity pants that are lower rise (thank you Motherhood Maternity) and one pair that has a flexible waist (Meijer) thanks to my Mom. Both of these are very attractive and hit at my hips or just below. Love them! Now if only I could find some jeans that are like that as well. Hmmmm.

Here are some of my belly pics:

4 weeks--when we found out!! i was skinny!

12 weeks

16 weeks (and yes that is a turtleneck)

20 weeks (i need to slow it down a bit)

Happy Pants Hunting and Belly Growing!
--Am

Monday, October 31, 2011

How To Hike in Brown County

After being cooped up in the house all last weekend, I couldn't spend another full day in the house. So on Saturday Al and I headed down to Brown County for some time out of the house! The leaves are so beautiful this time of year that I would go just to see them. But, I knew I couldn't get Alex to drive an hour fifteen to see changing leaves. Therefore, I threw in the idea of hiking.

Once there, we swerved and curved and peaked and valleyed until we reached the Brown County State Park. We drove through a good portion of the park until we reached the nature center. I was lured there with the promise of turtles, birds, and other wildlife. I expected the wildlife to be live, but most of it was stuffed. Besides a little area to watch birds and a snake, everything else was a decade or two old and not alive. We were there for 5 minutes before heading for the trail.

The trail started off downhill and wound around and around. We reached a huge staircase that we would eventually have to climb back up, but I was determined to get to the lake at the bottom. We continued to the bottom, where a serene lake waited. We stopped for a break before making the lap around the lake.

through the trees

the lake

whoa belly!

We lapped the lake and rested a bit before heading uphill. I knew that we'd eventually have to trek those stairs, so we paced ourselves. Uphill and pregnant is not fun...trust me! Here are the stairs from the bottom (left) and midway up (right):


Boy was it rough! However, not much longer and we were finished. Both of us were tired from the hike and ready to get home. We took a different home, which happened to take us right by the Edinburgh outlet mall. After a short bit of time at the Adidas (Alex) and Motherhood Maternity (Amber) stores, we hopped back on the interstate. With a short stop at a Whiteland apple orchard (I would not recommend), we were home by 6. All in all we had a nice day together and got some exercise in! If you do have a chance, get to Brown County before the leaves are all gone!

Happy Hiking!
--Am

Wednesday, October 26, 2011

How To Carve a Pumpkin

In order to carve a pumpkin, you must first find the perfect one! For me, this is very hard to do. I love the round ones that are symmetrical. I blame it on the accountant in me. Anyway, we went to our local pumpkin patch and selected three pumpkins, of which only one was large enough for carving. So, I had last Monday off and decided to tackle the carving.

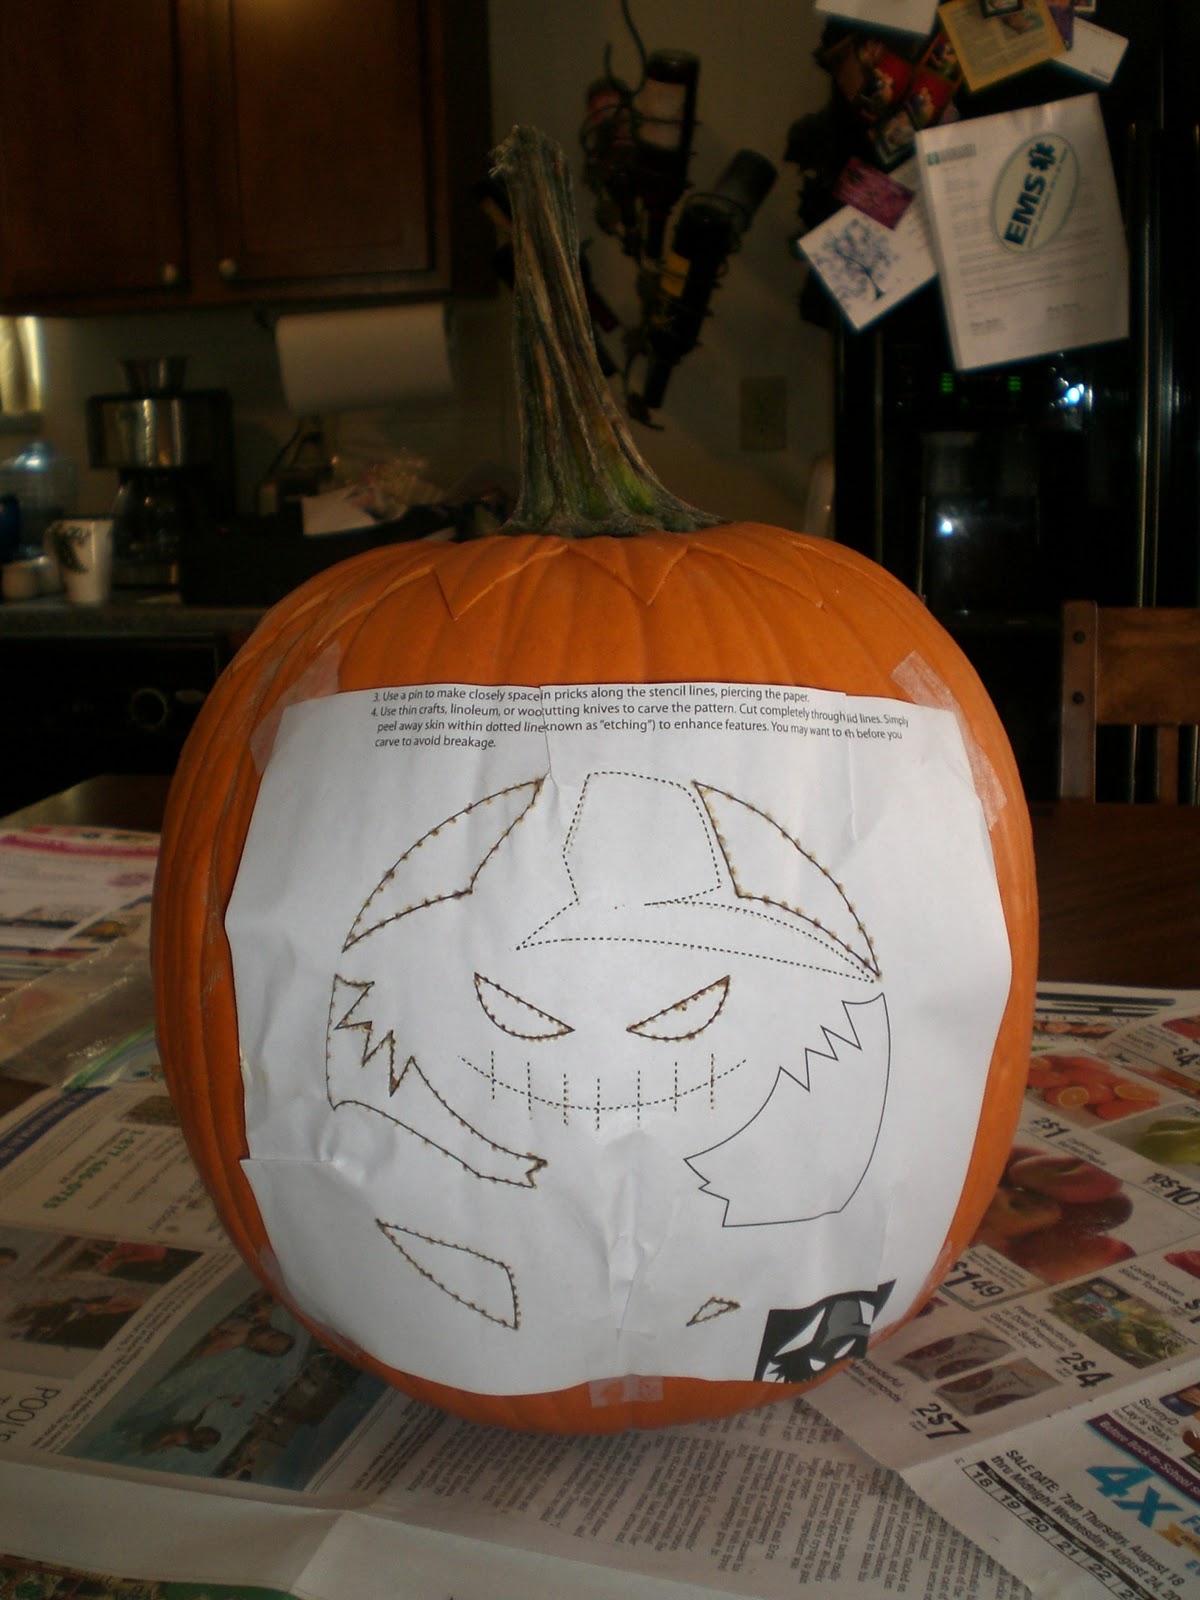
I usually don't have any creativity when it comes to making faces, so I went to the internet. I searched for pumpkin carving patterns and up popped BHG.com. After taking a short quiz, it directed me to some stencils I might like. Find them here. The one I chose is located under Seasonal Fall Pumpkin Stencils. I wanted one that wasn't too hard, but wasn't super corny either, so I went for a scarecrow. After the stencil was printed and newspaper was laid, it was time to get to cutting, scooping, carving, and roasting.

the tools

Alex was kind enough to cut off the top for me. I saved all the carving tools from a kit I purchased a couple years ago. This kit included a fancy scooper to get all the insides out. I kind of actually like how the insides feel, which is really gross and weird. But, I still like how it feels between my fingers. I scraped the inside clean and put the guts in a bowl to collect the seeds. Once gut-free, I taped the stencil to the outside and got carving. For the parts to be hollowed out, I outlined what I was going to cut by using the poker. For the shaded parts, I used the roller. These were a great outline for when the stencil was taken off. 

 the stenciled pumpkin

 geez hallie! clean that mess up.

Once off, I used the smaller carver to cut through the areas to be hollowed out. I used the large carver to finish the spots that I couldn't get all the way off with the smaller carver. For the shaded areas, I used the smaller carver to give me a start. Then I took the scraper (kind of looks like a hook), and started to shade away. It was important not to dig too deep so not to take off the whole piece. Overall, it only took me an 1 1/2 hours from start to finish. And I'm so happy with how it turned out!!

oooooooh...scary

dang, I'm good :)

Happy Carving!
--Am

Oh and of course you have to roast the seeds...YUM!